Pages

Showing posts with label DIY. Show all posts

Easiest DIY Project {EVER}

Friday, June 24, 2011

In addition to our wedding cake, we are going to have a table of specialty European style cakes at our wedding. Tiramisu, Cheesecake, Chocolate Hazelnut Cake, etc. They are going to be so good! So, I've been pulling out all of my cake stands and realized that I was one short. I browsed around online and found that making your own cake stand is the easiest DIY project ever! I am not kidding.

So, off to the antique shop I went. I found a beautiful milk glass candle holder for $3 and a gorgeous old plate (with handles) for $4. I came home, and with the help of my tube of Epoxy (Gorilla brand, found in the glue aisle at Home Depot), glued them together! Let it dry for 90 minutes and viola! My new cake plate:


{Personal Photos}

What was the easiest DIY project you completed?

Wedding Wedding Everywhere

Wednesday, June 8, 2011

I am laying on my living room floor right now surrounded by stuff. Honestly, my house has never been this messy. I am covered in coupons, ribbon, shower gifts, bridesmaids gifts, and endless unfinished craft projects. You know, the ribbon wands, picture frames for the photo wall, personalized hangers, survival kits, etc. If I look hard enough I might even be able to find a cute curly-haired dog or my wonderful fiance :-) They've got to be around here somewhere!

Yes, I am officially in the "holy crap I'm getting married in 9 weeks and I haven't finished started my DIY projects" phase! The pressure is on and I promise I'm starting to get things done (and documenting the process). I've always worked best under pressure!

What DIY project are you currently in the middle of?

DIY {Ribbon Wands}

Monday, February 21, 2011

Remember the other day when I told you that I was in love with the idea of ribbon wands?! Well guess what? I decided to make them! If you are apprehensive about doing things yourself, not at all crafty, and are interested in ribbon wands, this would make the perfect first DIY project for you. They are SO easy! Follow these simple steps and you will be on your way to a great ceremony send-off for only 25 cents each!

Materials:
1. Wooden Dowels (Woodsies Brand, 5/16 x 12 in...I got mine at Michael's)
2. Eye Screws (Walmart sells them in the section where you buy nails and other tools)
3. Ribbon (any width, color, style you want)
4. Lit candle (optional)
5. Needle nose pliers (optional)
6. Push Pin (optional)

Step 1:  Cut ribbon to the length you want (I cut mine to 4 feet). Choose how many strands of ribbon you want per wand (I chose 4 strands).


Step 2:   Using your push pin, start a hole in one end of your dowel. This will make it easier to screw in your eye screw.


Step 3:  After your hole is started, screw your eye pin into the end of the dowel. Hint:  Using needle nose pliers makes this step much easier.


Step 4:  Stack your ribbon together and pull it through the eye pin, pulling it until both sides are an equal length (so for me I had 2 feet on each side).


Step 5:  Double knot your ribbon around the eye screw.


Step 6:  Hold the ends of your ribbon (one at a time) close to the flame from your candle. This will melt the end of the ribbon and will prevent fraying. This is my favorite part :)


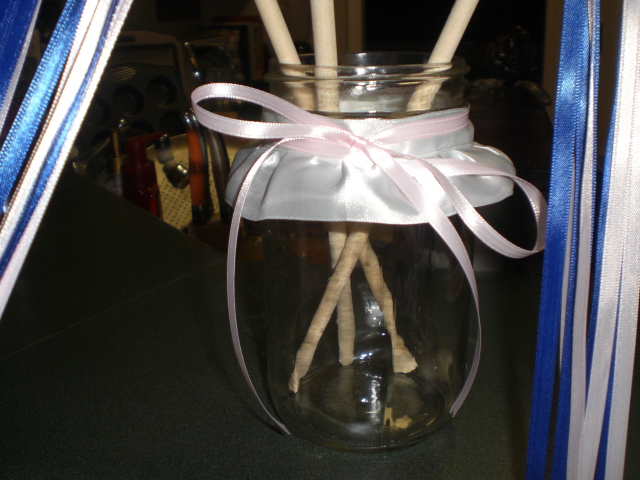
Place your ribbon wands in a cute glass, mason jar, or whatever you want and you are done!


P.S. This will also make a great toy for your cat!

 {Personal Photos}

If you don't want to use your ribbon wands as a ceremony send-off, check out this cute idea!!!
 

Stylish Send-Off!

Thursday, February 17, 2011

Oh ribbon wands, you are so whimsical and adorable. I want you to be involved in my wedding, some way, some how...

 {Source}


Wouldn't this be such a cute send-off from the church!? I think I feel a DIY project coming on and I can't wait to share! Is anyone else thinking about using these?!

Save the Date

Tuesday, February 1, 2011

Remember back in October when I gave you a sneak peak of our DIY save the dates? Well, they finally went out and (I hope) everyone received them! Now, I am able to share my lovely creation with all of you! These took me a while to complete but I'm pleased with the way they turned out. (P.S. you can click on the photo to see a larger and more detailed photo.)


After I created our bookmarks, I placed each of them in a small glassine bag and sealed it with a kraft label. We have a vintage theme going on so I chose three different labels, crowns, birds, and chandeliers. These labels were purchased from bljgraves on Etsy.


Then, each bag was placed in a pretty envelope with digital calligraphy used for the addresses.


Share your thoughts and feel free to check out our wedding website!

Crafty Girls...Help Me Out!

Monday, December 13, 2010

I was looking through the photos on my computer tonight and came across a picture of some wedding programs that I love. Sadly, I cannot remember the source of this photo. If anyone knows where it came from I would love to know so I can give the site credit.

I am posting it tonight to ask all you crafty girls out there for some help. I want to DIY these programs. I think it is totally possible but I just don't know where to start. If anyone can give me some of the specifics on what type of paper was used for the cover (it has a jagged edge), where I can find those cute little gold frames used around the picture, etc. I would greatly appreciate it. Do you guys think it is possible for me to make 100 of these?

Baby it's cold outside...

Saturday, October 30, 2010

It's 42 degrees in Madison, Alabama tonight and I'm actually enjoying it! I'm sitting here sipping hot tea while my pecan pie mini muffins are baking in the oven. In the background, I hear football on the TV in the other room. It so feels like Fall!!!

{Note:  I did not break down and buy the Williams-Sonoma acorn pan, but I did go to Walmart to purchase a mini cupcake pan for $4!}

In the spirit of cooler weather and Halloween, Mr. CF and I went to a little pumpkin patch today and purchased some very nice pumpkins. I am a new Alabama resident and it's an amazing feeling to go to a local farm (about 2 miles down the road) to buy pumpkins. The man was so nice and even gave us some sweet potatoes and one pumpkin for free! Such a great experience!

We came home and got to work! Here is my finished product:


I think my cat came out so cute and it was very easy. In case you'd like to make one next year, here are the steps I took:

What to buy - 2 pumpkins (1 large & 1 medium), 1 gourd, 1 can of black glossy spray paint, 1 sheet of orange felt, 1 sheet of black felt, 1 package of sticky rhinestones. You can find these items at Walmart and Michaels.

  • Cut stems off your pumpkins then spray them (and your gourd) with black spray paint. Let dry.
  • Cut a hole in the back of the medium sized pumpkin and clean out the guts.
  • Cut eyes into your medium sized pumpkin.
  • Cut two "ears" out of your black felt and line them with sticky rhinestones. Get creative!
  • Cut a "collar" out of your orange felt and design it with sticky rhinestones.
  • Arrange your pumpkins so they form a cat and then affix the ears and collar using straight pins.
  • Put a candle in your cat's head and you are done!

Happy Halloween!

(P.S. Can you spot Mr. CF's pumpkin in the background?!)

Engaged!

Friday, October 29, 2010

So as you may know from reading my blog, I am engaged! Mr. CF is SO creative, thoughtful, and loving and his proposal reflected those traits beautifully. August 20, 2010 was an amazing day and I will never forget it.

To celebrate, my mom threw us an engagement party in Florida. We had already planned a trip to Orlando to visit the Wizarding World of Harry Potter in early September so it was perfect timing! My mom chose a great restaurant in downtown Winter Park and decided that our party would take place on a Sunday morning and that brunch would be served. I loved the idea!

Below are some of the DIY projects I completed for the party:

Birdcage Card Box and Homemade "Cards" Sign!

Favor Box - Filled with a "Love is Sweet" note and Ferrero Rocher candies!

Some favors had this cute monogram on them (get yours here)
and others had Martha Stewart flower stickers (previous picture).

We had these napkins printed here and they came out great!

Gourmet Cupcakes from Serendipity Sweets in Orlando, Florida. A-M-A-Z-I-N-G!
My sister bought these for us!

I made these cupcake flags using scrapbook paper, clear beads, and toothpicks (all purchased at Michaels)!

LOVE the bling!

The happy couple! {Photo by The Real Life Mom}

What DIY projects did you take on for your engagement party, shower, or wedding?